Raised Panel Doors
HomeRaised Panel Door Tools and Techniques
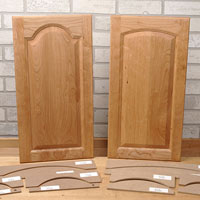 Raised panel doors have long been a hallmark of fine cabinetry. Unfortunately, many hobbyists and weekend woodworkers think that raised panel door construction techniques are strictly the territory of experts and professionals. In fact, that's not the case at all. Below, we'll take a look at some of the tools and techniques that make building impressive, classic raised panel doors a process that anyone with a few basic woodworking skills can enjoy.
And to show you just how easy the process can be, on page two of the article, we'll walk you through the steps involved in making an arched-top raised panel door. When you're ready to get started making your own frame and panel doors, you'll find all of the best-quality door making tools, equipment and supplies at Rockler Woodworking and Hardware.
How Raised Panel Doors "Work"
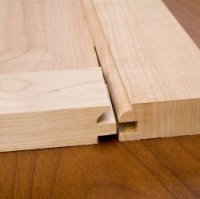
Raised panel doors are an example of frame and panel construction, a method developed hundreds of years ago to combat the effects of moisture on solid wood used in cabinetry and furniture making. In a frame and panel construction, a large panel is fitted into a groove in the interior edge of a more dimensionally stable frame made of narrow strips of wood. The panel is sized slightly smaller than actual dimension that the grooved frame will accommodate, and simply rests in the groove without being physically attached to the frame. Since the panel is given a little "room to move" and isn't physically attached to the frame, it is free to expand and contract with seasonal changes in humidity without affecting the stable shape and size of the frame.Tools for Fast, Accurate Frames
 For any frame and panel construction project, the first and most important task is to mill the parts of a sturdy, flat and square frame. There are a number of ways to accomplish this, and a variety of joinery methods that can be used for the all-important joints of the frame. For frame and panel cabinet doors, where joint stresses are usually light to moderate, the most popular choice is the fast and easy-to-master "cope and stick" method.
In cope and stick joinery, the frame is held together by a joint between the edge of the "stiles" (the vertical members of the frame) and the ends of the "rails" (the horizontal members of the frame). The "sticking" - the panel groove and the decorative profile on the interior edge of the frame - is matched by a special cut in the end of the rail called a "cope." To complete the joint, the two matching profiles are simply glued and clamped together. The strength of the joint relies on a near-perfect match between the cope and the sticking, which is achieved by using router bits designed especially for the purpose.
Stile and Rail Router Bits
Stile and rail router bits are available in a variety of designs and configurations. The "matched set" of stile and rail bits is among the most popular and easy to use. The sets are comprised of two router bits that are "matched" to produce an exact fit between the sticking profile and cope. Matched sets of stile and rail router bits are available in a variety of profiles, including ogee, bead edge, round edge and traditional. The most important consideration, however, is to look for a bit set that's manufactured to precision standards with cutters machined from quality carbide.| Traditional Stile and Rail Router Bit Set | |
| Stile and rail bits for beautifully crafted frames. Top quality bits that meet the high demands of Rockler Woodworking and Hardware. |  |
Stile and rail router bits are designed to be used strictly on a router table. The performance of the bits, in fact, depends to a large degree on the quality of the router table and on the availability of a few key accessories. To produce the perfectly square and level router cuts required in cope and stick joinery, the table needs, at minimum, to be flat, well supported, have a straight and reliable fence, and an accurate miter gauge. Beyond that, a few related pieces of equipment can go a long way in making the process smooth and successful:
| Rockler's #1 Router Table Package | |
| Our introductory package is the best value on the market! It includes your choice of standard router plate (1/4" x 8" x 11") plus our Rockler exclusive table, fence system and bit safety guard. (Legs sold separately) |  |
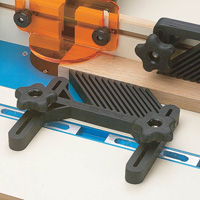
The Rockler Rail Coping Jig
Getting a cope cut that is square and consistent in height over the length of the cut is extremely important. Using a miter gauge to cope rails is an option, but care should be taken. A miter gauge set at an angle that is even slightly off 90 degrees will cause incorrectly cut rail ends and make square, close-fitting joints virtually impossible. And if the rails are not kept perfectly flat on the surface of the router table, the result is a cope that is out of level or at the wrong height. The result is a joint that is twisted or is not flush.The Rockler Rail Coping Jig really helps out, both in producing a square cut and in keeping the rail flat during the cut. The jig is pre-set at a 90 degree angle - you wouldd really have to try to make a cope that is not square. The jig clamps the rail securely in place (with the flip of a lever) so there is no chance that the stock will wander backwards out of the cut during the operation. With the rail clamped flat against the surface of the jig, getting a cut that is perfectly level and at exactly the right height is just a matter of keeping the jig flat against the surface of the table during the cut, an operation that the jigs ergonomic, "hand-plane" design makes easy and natural. The replaceable hardwood backer completes the package by virtually eliminating the problem of tear-out when the coping bit exits the cut.
| Rockler Rail Coping Jig | |
| For rail and stile doors. Allows you to easily make clean cope cuts without blowouts. Perfect for narrow cross-grain rail cuts. |  |
Router Bit Set Up Jigs
 Router Bit Set-Up Jigs |
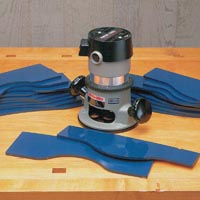
Cathedral and Arched Door Templates
|
|
|


Feather Boards
 Keeping the stock flat against the surface of the router table and up tight against the router table fence while cutting the sticking profile is of primary importance. "Feather boards" apply gentle even pressure on the stock while you are making sticking profile cuts, leaving you free to concentrate on moving the stiles and rails through the cut at the slow, even rate necessary to produce a clean edge. Feather boards are nothing new - they have been around for a very long time. But certain improvements over the years have made them easier to use and set up. The feather boards available as an accessory for Rockler Router Table Packages, for example, are designed to attach and adjust to the perfect position in a few seconds.
Perfect Panels
In many ways making the panel is the least challenging part of raised panel door construction. The panel is really just a passenger in the door frame, and does not really contribute to the structural strength of the door. The main challenge in the panel-making process is to create a smooth edge profile that is exactly the right thickness to fit snugly in the panel groove. To do that, you need a quality raised panel router bit. Here, you have a few options:Vertical Raised Panel Bits
| Raised Panel Router Bit - Ogee | |
| Available in Horizontal and Vertical. Both have a 1/2'' shank. Top quality bits that meet the high demands of Rockler Woodworking and Hardware. |  |
Horizontal Raised Panel Bits
| Raised Panel Router Bit - Ogee | |
| Available in Horizontal and Vertical. Both have a 1/2'' shank. Top quality bits that meet the high demands of Rockler Woodworking and Hardware. | |
Horizontal Raised Panel Bits with Back Cutters
| Raised Panel Bits with Back Cutters | |
| Now you can get the look of professional-style straight and arched raised panel doors without the price! You’ll be able to cut the front and back of a raised panel with just one pass. |  |
Space Balls Stop Panel Rattle
 Space Balls |
Assembly Tips for Flat Doors
| Bessey K-Body Clamps and Kit | |
| System allows for easy alignment of all four clamps together for raised panel door contruction. Kit contains two 24'' K-Body clamps, two 40'' K-Body clamps, and one set of four K-P Blocks as shown at right. |  |
| Sure-Foot Pipe Clamp Pads and Conversion Pads | |
| Pads slip over Sure-Foot pipe clamp jaws to protect against damaging wood and projects. |  |
Putting Theory into Practice
Now that you have an idea of the tools and techniques that go into successful raised panel door construction, the next step is to see them in practice.
Woodworking

|
 Rockler Gift Certificate |
||
| ||||||||||
| We do not sell to and/or ship to the state of New York. Sorry, the new state "vendor" tax code is harsh and costly! | ||||||||||
Training |
Woodworking
Wholesale Wood / Pen Supplies Rockler | Pen Making
Home Automation & Surveillance
|
|||||||||
1-Chronicles 4:10 | ||||||||||