Raised Panel Door Tools and Techniques
Home
Part II - An Arched-Top Raised Panel Door in Ten Steps
Below, we'll go through the steps involved in making an arched-top raised panel door. As you'll see, with the right tools and equipment, the process is actually fairly simple and straightforward. Woodworkers with intermediate skills and some experience using a router table will have no trouble mastering the techniques in a short time.
Step 1 - Selecting and Preparing the Stock
The first step in making a frame and panel door is to select and prepare the stock. This step is important. The squareness and flatness of the finished door will depend in a large part on the quality of the stock selected. In selecting the stock for our door, we sorted through several pieces of cherry hardwood before selecting a few pieces that appeared flat, free of twists and relatively straight-grained.
 Bill Hylton’s Frame and Panel Magic Book |
 Arch Door Templates |
At this point, you can cut the stiles to a length of 1 or 2 inches longer than their finished size - you'll trim them to their exact length later on. Prepare the stock for the panel at this point also. You may also need to edge glue two or more pieces of stock together to come up with a piece that's both wide enough for the panel and as flat as possible.
Don't like math? The Woodshop Calculator will do it for you. This affordable software system does all of the calculations necessary for frame and panel door construction.
Note: If you are planning to trim the edges of the finished door, or finish them with a Custom Door Edge Router Bit, you'll want to add 1/16'' or so to the width of the stiles and rails. Remember also that you will be trimming this off when you finish assembling the door. You need to leave the extra width out of your calculations for the length of the rails.
Custom Door Edge Router Bit
Woodshop Calculator CD-ROM
Affordable software eliminates time and costly mistakes when making raised panel doors. ..


Step 2 - Calculating the Length of the Rails
Once you have the bottom rail and the blank for the top rail cut to width, you can begin preparing for the cope cut by calculating the length of the rails. This can be a little tricky. To determine the length of the rails, you need to subtract the combined width of the two stiles from the overall width of the door, and then add back in the depth of the panel groove (to account for the overlap between the panel groove and the coped end of the rail). Here is a formula for calculating the length of the rails:
| Rail Length = | |
| Door Width | |
| - | Width of stiles x 2 |
| + | Panel Groove Depth x 2 |
14-1/4" | |
Most stile and rail bits (including the Rockler Stile and Rail Bit Set used here) cut a 3/8'' deep panel groove. Using the Rockler bit set, for a door to be 18'' wide when it's finished, with a 2-1/4'' finished stile width, the rail length should be:
 | Round Stile and Rail Router Bit Set Stile and rail bits for beautifully crafted frames... |
| Rail Length = | |
| 18" | |
| - | 4-1/2" |
| + | 3/4" |
14-1/4" | |
Step 3 - Setting the Coping Bit Height
 With the bottom rail and the blank for the arched top rail cut to length, you're ready to set up to cope the ends of the rails. Setting the coping bit to the correct height is important. The match between the height settings of the stile and rail bits will determine whether the stiles and rails meet flush with one another.
The Rockler Router Bit Set-Up Jig makes setting the bit height easy. The jig has the sticking profile cut at optimum height into one of its sides, and the matching cope cut into the other. You just raise the bit until it fits into the jigs cope profile and the bit is set at the optimum height. When it comes time to cut the sticking profile, simply repeat the procedure using the sticking profile on the other side of the jig.
 | Router Bit Set-Up Jigs Set your router bit to the precise height every time!.. |
Step 4 - Cutting the Copes
 Rockler Rail Coping Jig |
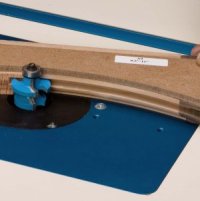
To make coping the rails easier, and to insure our coping accuracy, we used the Rockler Rail Coping Jig. The jig's backer is set to make a perfectly square cut. The jig is also designed to keep the end of the rail level with the coping bit during the cut. Just butt both the edge of the jig and the end of the rail up against the fence and clamp the rail in against the hardwood backer. The backer (included with the jig) prevents "tearout" that would otherwise happen when the rail exits the cut. When we have one coped, we just flip the rail around and do the other side.
Note: When making the second cope cut on each rail, be sure to turn the rail around end for end - don't flip it over. It is surprisingly easy to forget that both cope cuts have to be made with the same side of the rail facing up.
Step 5 - Cutting the Sticking Profile
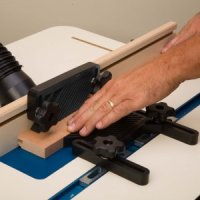 Next, set the height of the sticking profile bit - again, we recommend using the Rockler Router Bit Set-Up Jig. For the straight-line profile cuts on the stiles and bottom rail, position the fence so that the profile cut will end up on the very edge of the stock. Use a straightedge to line the stile bit's pilot bearing up with the surface of the fence. Since the sticking profile and groove are cut along the length of the grain, tearout at the end of the cut is not a concern. Just feed the stock at a moderate rate, and make sure that it's kept in firm contact with the fence and the surface of the router table over the entire length of the cut.
Once you have the fence set up, run all of the straight edges - the two stiles and the bottom rail. While you're at it, put a profile on a couple of extra pieces. You'll use them in the next step.
Step 6 - Cutting and Milling the Arched Top Rail
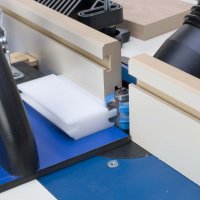
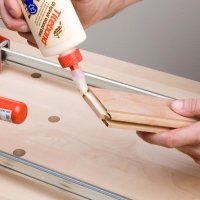
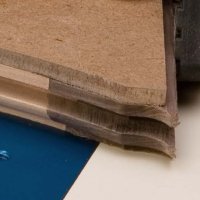 Now you're ready to cut the arch in the top rail. Here's a trick that will make the process safer and much easier: Fit "temporary stiles" (short pieces of stock milled with the sticking profile) into the end of the blank and clamp the three pieces together with a lightweight bar clamp. The purpose of the temporary stiles is to provide a place to start the profile cut.
Skipping this part means that you would have to start the cut on the very tip of the arch and run the risk of the bit catching hold of the corner of the rail, which would at the very least damage the corner or coped end of the rail. Apart from being potentially dangerous, having this happen is an unpleasant surprise that turns a perfectly good arched rail into a piece of scrap. The temporary stiles also protect the fragile end of the arch from breaking off when you exit the sticking profile cut.
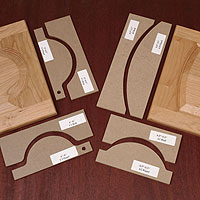
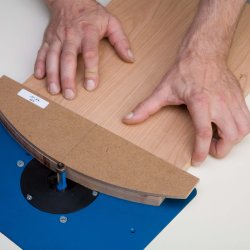
With the three pieces clamped together, mark off the arc, using the rail template that comes with the Arched Door Template Set (be sure to choose the rail template that has the correct width range for the door you are making) and rough-cut the shape 1/16'' oversized with a band saw. To make the sticking cut in the arched top rail, attach the pattern to the blank with double-sided tape. The template will guide the router bit's pilot bearing, so you want to make sure that it's secure and won't slip during the cut.
 Note: With the temporary stiles clamped securely in place, and the pattern attached securely to the top of the rail, cutting the top rail sticking profile is usually a smooth procedure, but also requires extra care. Starting a router cut in the middle of an edge can cause the bit to climb (pull the stock in the opposite direction from the intended cut direction). Be sure to ease into the cut slowly, hold on to the rail/temporary stile firmly, and keep your fingers well away from the path of the bit. If you have limited experience using a router and router table, making a few test cuts on a piece of scrap to get the feel of the procedure would be a good idea.
| Arch Door Templates Arch Door Templates.. |
Step 7 - Cutting the Panel to Width
The first question to ask yourself when figuring the width of a solid wood panel is "how's the weather?" In other words, you'll need to factor in how the humidity level in your shop while you are making the panel is affecting the stock. If you are working in a northern climate in the dead of winter in an un-humidified shop, the wood you are about to make into a panel is probably about as dry as it's likely to get. In that case, you'll need to reduce the width of the panel by 1/8'' for every 12'' of width to allow for expansion when the humidity is high. The width of a fully moisture-expanded panel should still be 1/16'' less than the length of the door's rails to provide a little assembly clearance.The formula for the width of a door panel is:
| Panel Length = | |
| Rail Length (from tip to tip) | |
| - | Expansion Allowance |
| - | 1/16" Assembly Clearance |
Note: If you're planning to use Space Balls to keep the panel centered and to forestall any possibility of "panel rattle," increase the assembly clearance for both the width and height of the panel from 1/16'' to 1/4'' total (1/8'' for each side).
 Space Balls |
It was a sultry summer day when we cut the parts for our door, so we assumed that our stock was about as loaded up with moisture as it was likely to get. We just subtracted 1/16'' from the total length of our rails to find the width of the panel.
Step 8 - Cutting the Panel to Height
Since wood expands far more across the grain than lengthwise along the grain, the height of the panel can be made just 1/16'' smaller (for assembly clearance) than the actual dimension of the available space inside the panel groove. If you are making an arched top door, the width of the top rail, of course, varies. Using the width of the rail at its narrowest point (midpoint between the two ends) will allow you to determine the height of the panel at its tallest point:
| Panel Height = | |
| Door Height | |
| - | Top Rail Width (at the center) |
| - | Bottom Rail Width |
| - | 1/16" Assembly Clearance |
| + | Panel Groove Depth x 2 |
 When you've calculated the height of the panel at its tallest point, and the panel blank is cut to its finished width, you are ready to mark and cut the curved top of the panel. Use the panel template to mark off the shape of the arched top of the panel. Be sure that the template is square with the edge of the panel, and that it's placed so that you'll end up - after rough-cutting the arch - with a piece that's 1/4'' or so longer than the finished panel height you've calculated.
Note: Be sure to use the panel template from the Arched Door Template Set that corresponds to the rail template you used in Step 6! The rail templates are clearly marked to help make this easy.
| Arch Door Templates Arch Door Templates.. |
When rough-cutting the panel, keep the band saw's blade well on the scrap side of the line - you'll use the line again when you attach the template to the panel in order to trim it smooth with a flush trim router bit. When you have the arch trimmed smooth, simply measure down the panel along the center line from top to bottom to mark off the panel height you've calculated. Crosscut off the excess to finish sizing the panel.
| Flush Trim Bits |
|
|
| ||||||
|
|
| ||||||


Step 9 - Cutting the Panel Profile
 With the panel cut to size, you're ready to profile the panel with a raised panel router bit. Having decided on a cove profile for the edge of the panel, we cut our panel profile with a cove profile horizontal panel raising bit. The bit we used was equipped with a "back cutter," meaning that it makes a cut in the back of the panel as well as the front. There are two advantages to using this type of bit: Simply raising and lowering the height of the bit allows you to quickly and easily place the raised field of the panel anywhere you'd like in relation to the front surface of the frame. The back cutter also insures that the panel edge will be exactly the right thickness to fit snugly into the panel groove.
We decided to have the surface of our panel protrude up past the surface of the frame by as much as possible, but we set the bit height so that the back cutter would take off 1/32'' of material to insure that the edge of the panel would be exactly the right thickness for the panel groove.
To cut the panel profile, set the raised panel bit at the desired height and use the bit's pilot bearing to carefully guide the curved top of the panel through the cut. Be sure to grip the panel firmly and keep it pressed tight against the surface of the router table at all times. Then, for a little added support while cutting the straight sides of the panel, set the fence in line with the panel bit's pilot bearing as you did with the sticking profile bit in Step 5. Use the fence as a guide while you cut the straight sides of the panel, beginning with the bottom edge.
| Raised Panel and Stile and Rail sets |
Stile and Rail Bit Sets for creating raised panel doors. Both horizontal and vertical raised panel bits.


Step 10 - Assembly
 Assembling the door is a fairly straightforward process, but there are a few thing to watch out for. Most importantly, the surface you're working on when gluing-up the door should be as close to perfectly flat as possible. Here, we used the Bessy K-Body Clamp System, which is designed to help keep parts flat and square during glue-ups.
We recommend cutting the stiles to their exact finished length (plus any extra width you've added to the rails for trimming) before assembly. That allows you to take advantage of the clamp system's K-P Blocks. The K-P blocks make it possible to arrange clamps for four-sided clamping, and allowed us to use the length-wise clamps to align the top and bottom ends of the stiles with the top and bottom edges of the rails.
| Bessey K-Body Clamps and Kit | |
| System allows for easy alignment of all four clamps together for raised panel door contruction. Kit contains two 24'' K-Body clamps, two 40'' K-Body clamps, and one set of four K-P Blocks as shown at right. |  |
It's a good idea to "dry-fit" the parts before applying the glue, just to make sure that everything fits together correctly, and that you have the procedure down. When you're satisfied with the fit of all of the door's parts, apply a judicious amount of glue to the ends of the rails and assemble the door. Gently clamp the parts together (you don't need a lot of clamping pressure - just look for a tight fit between the stiles and rails). It is extremely important to press the door down flat against the surface of the clamps while tightening them down. When the clamps are tightened, check the door for flatness with a straightedge or level. If the door is out of flat, loosen the clamps, press the door down flat against them and re-tighten them.
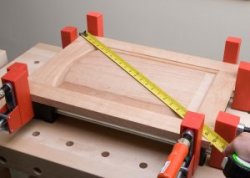 Finally, wipe off any excess glue and check the squareness of the door by measuring diagonally cross-corners in both directions. If the rails have been cut and coped square, the door should clamp up square almost "automatically." But it's a good idea to check anyway.
If the cross-corner measurements don't match, the door is out of square. Loosen the clamps slightly and apply a clamp across the two corners that have the longest corner-to-corner measuremen. Slowly tighten the diagonal clamp while monitoring the opposite corner-to-corner measurement. When the difference between the two measurements is equalized, re-tighten the clamps and check again for flatness.
Follow the glue manufacturer's instructions for clamping time. After unclamping the door, trim the edges of the door as needed, or finish them with a Custom Door Edge Router Bit. In most cases, you'll just need to give the door a light sanding before finishing with a quality wood finish.
Woodworking

|
 Rockler Gift Certificate |
||
| ||||||||||
| We do not sell to and/or ship to the state of New York. Sorry, the new state "vendor" tax code is harsh and costly! | ||||||||||
Training |
Woodworking
Wholesale Wood / Pen Supplies Rockler | Pen Making
Home Automation & Surveillance
|
|||||||||
1-Chronicles 4:10 | ||||||||||